If you’re interested in getting stronger, you understand that there are different types of bars used for specific exercises.
One that’s been steadily gaining popularity due to its unique design and the myriad of benefits it offers – is the Safety Squat Bar.
This specialized piece of equipment is transforming the way athletes and fitness enthusiasts approach their squat routines, offering a fresh take on a classic exercise.
The Safety Squat Bar, or SSB, is not just a trend, it’s a game-changer that’s here to stay.
It provides a solution to common squat-related challenges and opens up new avenues for strength and muscle development.
But what makes it stand out from the traditional barbell?
Let’s find out!
On This Page
What is a Safety Squat Bar?
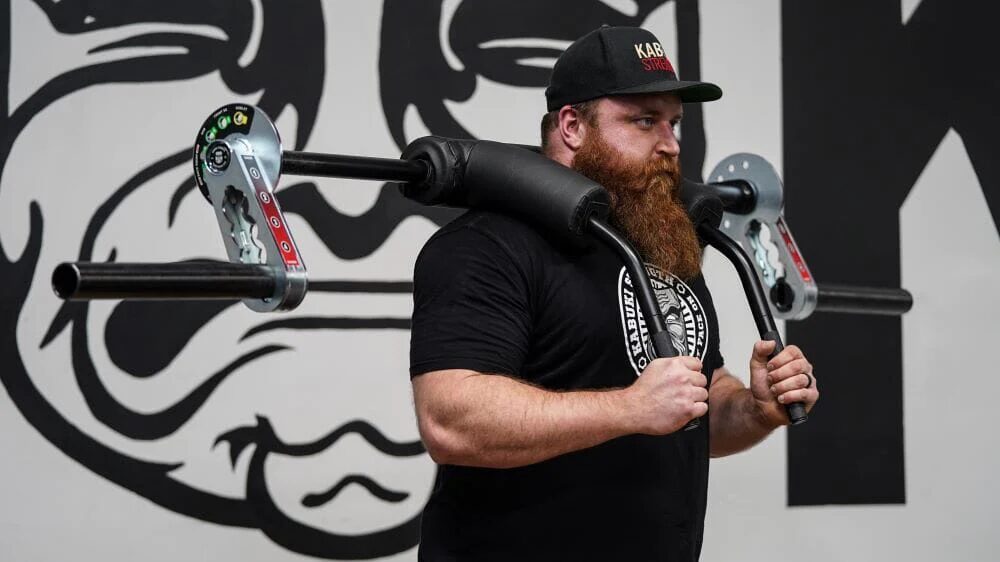
The Safety Squat Bar is a unique variation of the standard barbell. It’s specifically designed to alter the dynamics of the squat, making it more accessible, safer, and more effective for a wider range of individuals.
Unlike a regular barbell, the Safety Squat Bar features a curve (bend) at both ends. This design shifts the center of gravity forward compared to a traditional back squat, leading to a different squat experience.
The bar is also known as the ‘Hatfield Bar’, named after Frederick Hatfield, also known as ‘Mr. Squat’, a significant figure in the powerlifting world who contributed to the bar’s breakthrough.
The design of the Safety Squat Bar is such that it relieves your shoulders from the constant tension they would normally be under during a back squat or a front squat.
This makes it an excellent solution for people with sensitive shoulders or those recovering from shoulder injuries.
To give you a clearer picture, here’s a comparison table between a Safety Squat Bar and a regular barbell:
| Safety Squat Bar | Regular Barbell | |
| Design | Curved at both ends | Straight |
| Center of Gravity | More forward | Directly under the bar |
| Shoulder Position | Relaxed | Under constant tension |
| Popularly Known As | Hatfield Bar | Olympic Bar |
If you want to learn more, check out my full guide here.
The Importance of Training with Variations
Variety is the spice of life, and this holds true in the realm of strength training as well.
Incorporating variations in your workout routine is not just about keeping things interesting, it’s a crucial aspect of progressive overload, injury prevention, and overall fitness development.
Variations in strength training allow you to target different muscle groups, work on weak points, and challenge your body in new ways.
This helps prevent plateaus, reduces the risk of overuse injuries, and can lead to more balanced muscle development.
The Safety Squat Bar offers a unique variation to traditional squatting.
Its design changes the dynamics of the squat, shifting the load and altering the muscles emphasized during the movement.
This makes the Safety Squat Bar a valuable tool for diversifying your strength training routine and unlocking new levels of performance.
Key Benefits of the Safety Squat Bar
The Safety Squat Bar is more than just a variation of the traditional barbell squat. It offers a host of benefits that can enhance your strength training routine.
Here are some of the key benefits:
Improved Confidence in Lifting
The Safety Squat Bar’s unique design can help improve your confidence in lifting.
The forward shift in the center of gravity can make the bar feel more secure on your shoulders, allowing you to focus more on the lift and less on balancing the bar.
Reduced Strain on the Shoulders
One of the main advantages of the Safety Squat Bar is the reduced strain it places on your shoulders.
The bar’s design allows your hands to be in a more natural position, reducing the stress on your shoulder joints.
This makes it an excellent option for those recovering from shoulder injuries or those who experience discomfort during traditional squats.
A More Stable High-Bar Position
The Safety Squat Bar naturally encourages a high-bar position, which can lead to a more upright torso during the squat.
This can result in a more stable squat and reduce the risk of leaning forward, a common issue with low-bar squats.
Increased Emphasis on the Upper Back and Abs
The Safety Squat Bar places a greater emphasis on the upper back and abdominal muscles compared to a traditional squat.
This can lead to stronger abs and a more muscular upper back, both of which are crucial for overall strength and stability.
Correcting Movement Deficiencies
The Safety Squat Bar can help correct movement deficiencies, such as a forward lean during the squat.
The bar’s design encourages a more upright position, helping to improve your squat form over time.
Improvement in Strength to Stabilization Muscles
The Safety Squat Bar can help improve the strength of your stabilization muscles.
These muscles are crucial for maintaining balance and stability during the squat, and the Safety Squat Bar’s unique design challenges these muscles in new ways.
Better Range of Motion Compared to Back Squat
The Safety Squat Bar can allow for a better range of motion compared to a traditional back squat.
The bar’s design encourages a more upright torso, which can allow for a deeper squat and a greater range of motion.
Safety Bar Squat vs. Back Squat
When it comes to squat variations, the traditional back squat and the safety squat bar are two popular choices.
Each has its unique characteristics and benefits, and understanding these can help you make the most of your strength training routine.
The traditional back squat is a staple in strength training, known for its effectiveness in building lower body strength and power.
It requires the barbell to be placed on the upper back, and the lifter to maintain a straight posture throughout the movement.
This squat variation primarily targets the quadriceps, hamstrings, and glutes, but also engages the core and lower back.
On the other hand, the safety squat bar offers a unique take on the squat exercise.
Its design shifts the center of gravity forward, which changes the muscles emphasized during the squat.
This variation places a greater load on the upper back and abs, making it a great tool for developing these areas. Additionally, the safety squat bar is easier on the
shoulders, making it a better choice for those with shoulder mobility issues.
One of the key advantages of the safety squat bar is its potential to improve your form for back squats.
By encouraging a more upright torso and a high-bar position, the safety squat bar can help correct common squat deficiencies, such as a forward lean.
This can translate to improved form and performance in your back squats.
How to Use a Safety Squat Bar
Using a safety squat bar is slightly different from a traditional barbell. Here’s a step-by-step guide on how to use it:
- Position the bar: Start by positioning the bar on your upper traps, similar to a high-bar squat. The padding should rest comfortably on your shoulders.
- Grip the handles: Hold onto the handles in front of you. This position reduces the need for shoulder rotation, making the lift more comfortable for those with shoulder issues.
- Unrack the bar: Stand up straight to unrack the bar, stepping back to position yourself for the squat.
- Perform the squat: Squat down as you would in a traditional squat, keeping your chest up and back straight. The design of the safety squat bar will encourage you to maintain an upright position.
- Return to the starting position: Push through your heels to stand back up, completing one rep.
While the safety squat bar can make squatting more comfortable, it’s important to avoid common mistakes.
One such mistake is leaning forward during the squat, which can strain your lower back. Always aim to keep your torso upright throughout the movement.
Frequently Asked Questions
Conclusion
The safety squat bar is a versatile tool that offers unique benefits for strength training.
From reducing shoulder strain to improving squat form and targeting the upper back and abs, the safety squat bar is a valuable addition to any strength training routine.
Whether you’re a seasoned lifter looking to switch up your training or a beginner seeking a more accessible way to squat, the safety squat bar is worth considering.
Ready to take your strength training to the next level?
Explore the best safety squat bars and start reaping the benefits today!
Until next time,
-Dante